
Caramel Apples Recipe
Introduction
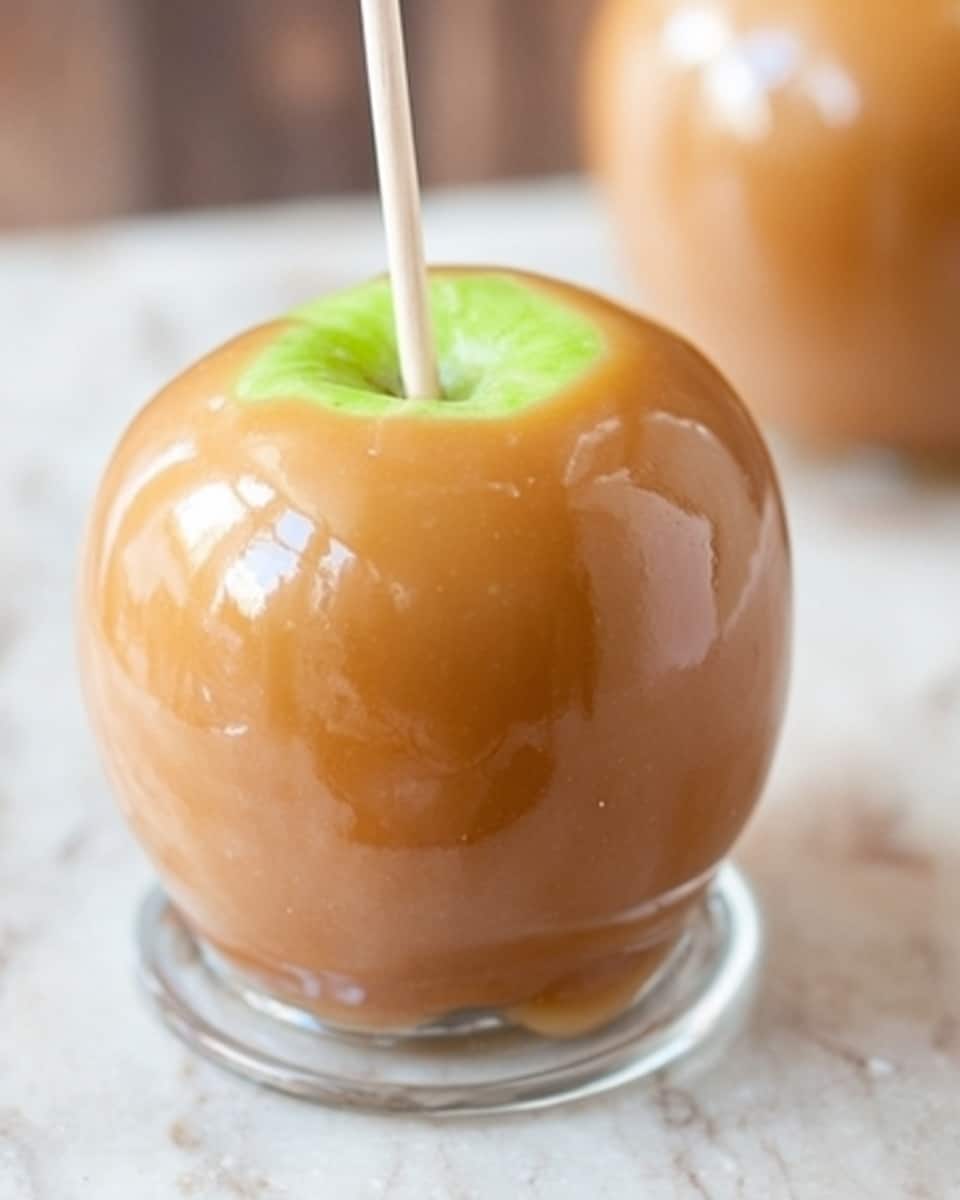
Caramel apples are a timeless treat that combines crisp, juicy apples with rich, buttery caramel. Perfect for autumn gatherings or a fun dessert, this recipe helps you create a smooth, flavorful caramel coating that hardens to a perfect finish. Let’s dive into making your own delicious caramel apples at home.

Ingredients
- 1 cup heavy cream, divided
- ¾ cup dark corn syrup
- ½ cup unsalted butter, cut into pieces
- 1 cup sugar
- 1 tsp. vanilla
- Baking spray
- 6 apples
- Candy thermometer
- Parchment paper
- Candy apple sticks
Instructions
- Step 1: In a heavy-bottomed saucepan, combine ¾ cup of the heavy cream, dark corn syrup, butter pieces, sugar, and vanilla. Attach a candy thermometer ensuring the tip is immersed in the syrup but not touching the pan’s bottom or sides.
- Step 2: Heat the mixture over high heat until the temperature reaches between 244-248°F. Use a spoon to gently move aside some of the light froth on top to check the syrup’s color. When it resembles the color of peanut butter, remove the pan from the heat. If it’s too light, continue heating until the desired color is reached.
- Step 3: Remove the pan from heat and carefully stir in the remaining ¼ cup of heavy cream. Swirl gently to combine the caramel.
- Step 4: While the caramel is cooking, prepare a baking sheet by lining it with parchment paper and spraying it with baking spray.
- Step 5: Wash and dry the apples thoroughly. Insert the candy apple sticks through the stem end. For longer sticks, push them fully into the apple without piercing the other side; for shorter sticks, insert them about halfway.
- Step 6: Once the caramel stops bubbling, hold an apple by the stick and dip it into the caramel sauce. Tilt the pan as needed to coat the entire apple. Hold the apple over the pan and gently shake to remove excess caramel. If desired, dip the coated apple in nuts, sprinkles, or other toppings now.
- Step 7: Place the coated apples upright on the prepared baking sheet and allow the caramel to harden. Repeat the dipping process with the remaining apples. Unused caramel sauce can be refrigerated and reheated gently to coat more apples later.
Tips & Variations
- For extra flavor, sprinkle chopped nuts, crushed cookies, or colorful sprinkles on the caramel before it sets.
- Choose crisp, tart apples like Granny Smith for a nice contrast with the sweet caramel.
- If you don’t have a candy thermometer, cook the caramel until it reaches a deep amber color and thick consistency, but be careful not to burn it.
- To ensure smooth caramel, avoid stirring too vigorously once the sugar has dissolved and during cooking.
Storage
Store caramel apples in a cool place or refrigerator for up to 2 days. To prevent the caramel from getting sticky, place apples on parchment or wax paper. If refrigerated, allow them to come to room temperature before serving for the best texture. Leftover caramel sauce can be stored in an airtight container in the fridge for up to a week and gently reheated before reuse.
How to Serve
Serve this delicious recipe with your favorite sides.
FAQs
Can I use other types of apples for caramel apples?
Yes, you can use any firm apple variety you like. Tart apples such as Granny Smith provide a nice balance to the sweetness of the caramel, but sweeter apples like Fuji or Gala work well too based on your preference.
How do I prevent caramel from sticking to the pan?
Using a heavy-bottomed saucepan helps distribute heat evenly and prevents burning. Avoid stirring too much once the sugar has dissolved, and keep the thermometer tip from touching the pan’s bottom to get accurate temperature readings. Also, spraying the parchment paper prevents sticking when the apples are setting.
Print
Caramel Apples Recipe
- Total Time: 30 minutes
- Yield: 6 caramel apples 1x
Description
This Caramel Apples recipe offers a delightful homemade treat where crisp apples are dipped in a rich, creamy homemade caramel sauce made from heavy cream, dark corn syrup, butter, sugar, and vanilla. Perfect for fall or any festive occasion, these caramel apples combine the sweet, buttery flavor of caramel with the fresh, tart crunch of apples for a classic dessert everyone will love.
Ingredients
Caramel Sauce
- 3/4 cup heavy cream
- 3/4 cup dark corn syrup
- 1/2 cup unsalted butter, cut into pieces
- 1 cup sugar
- 1 tsp vanilla extract
- 1/4 cup heavy cream (added after cooking)
Caramel Apples
- 6 apples
- Candy apple sticks
- Baking spray
- Parchment paper
- Candy thermometer
Instructions
- Prepare the Caramel Sauce: In a heavy-bottomed saucepan, combine 3/4 cup heavy cream, dark corn syrup, butter pieces, sugar, and 1 tsp vanilla. Attach a candy thermometer ensuring the tip is submerged but not touching the pan sides or bottom.
- Heat to Caramel Stage: Heat the mixture over high heat until the temperature reaches between 244°F and 248°F. Use a spoon to carefully skim off some light froth to check the syrup color. Once the caramel turns a rich peanut butter shade, remove from heat. If not quite there, continue heating briefly.
- Finish the Caramel Sauce: Remove from heat and carefully stir in the remaining 1/4 cup heavy cream and additional vanilla, if desired. Swirl gently to combine the mixture smoothly.
- Prepare Apples: While the caramel cooks, line a baking sheet with parchment paper and spray lightly with baking spray. Wash and thoroughly dry the apples. Insert candy sticks through the stem end, pushing them fully in without piercing through the other side or halfway depending on stick length.
- Coat Apples: When the caramel stops bubbling, hold each apple by the stick and dip into the caramel sauce, tilting the pan if needed to cover the apple fully. Hold the apple over the pan and shake gently to remove excess caramel. Optionally, dip in toppings like nuts or sprinkles immediately after.
- Set the Apples: Place the coated apples stick-up on the prepared baking sheet and allow the caramel to harden completely at room temperature.
- Store Leftover Caramel: Any unused caramel sauce can be refrigerated and gently reheated to coat more apples later.
Notes
- Use firm, fresh apples like Granny Smith or Honeycrisp for the best texture and flavor contrast.
- Ensure the thermometer tip doesn’t touch the pan to get accurate temperature readings.
- The caramel color should resemble peanut butter for proper doneness — too light means undercooked, too dark could be burnt.
- Allow caramel to cool slightly before adding extra cream to prevent splattering.
- Once dipped, work quickly with toppings to ensure they stick while caramel is tacky.
- Store caramel apples at room temperature for up to 2 days for best texture, or refrigerate and bring to room temp before serving.
- Prep Time: 15 minutes
- Cook Time: 15 minutes
- Category: Dessert
- Method: Stovetop
- Cuisine: American
Keywords: caramel apples, homemade caramel, fall dessert, candy apples, sweet snack

